#

<div class="header">
  <div class="inner">
    <img src="/static/images/logos/drupal-pro.png" alt="Drupal Logo">
    <div>
      <h1 style="color: #222;">Drupal</h1>
      <p style="padding-left: 2rem; margin-bottom: 0; color: #222;">Build simple or complex websites and apps with a leading open source CMS.
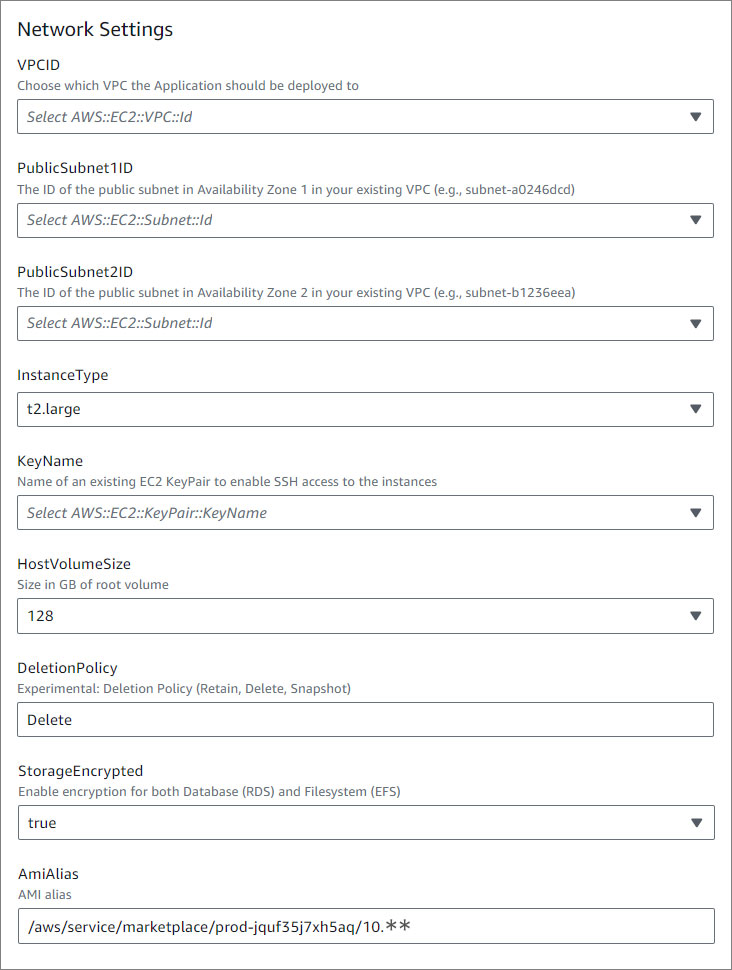
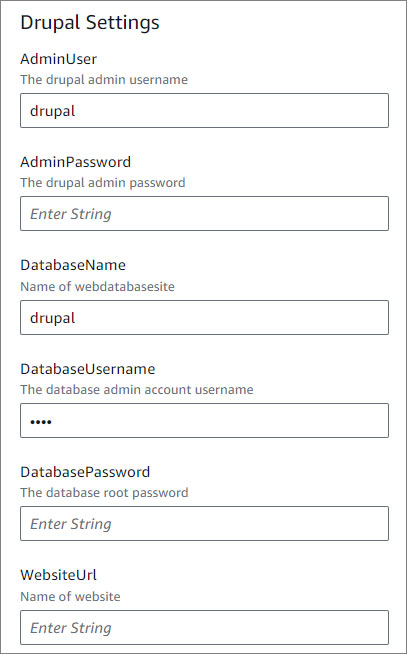
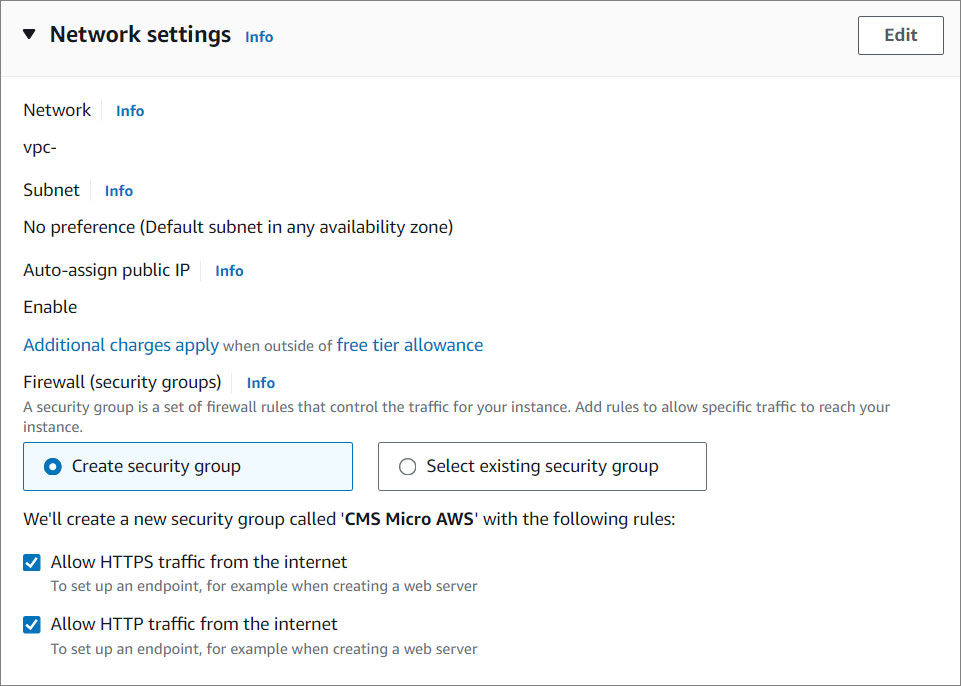
</p>
    </div>
  </div>
  <a href="https://aws.amazon.com/marketplace/pp/prodview-wlzg335aurypc" rel="noopener noreferrer" target="_blank" class="btn-orange-lg">SUBSCRIBE <span style="padding-left: .5rem; display: inline-flex; align-items: center;"><svg xmlns="http://www.w3.org/2000/svg" viewBox="0 0 16 16" width="20" height="20" fill="#fff"><path d="M3.75 2h3.5a.75.75 0 0 1 0 1.5h-3.5a.25.25 0 0 0-.25.25v8.5c0 .138.112.25.25.25h8.5a.25.25 0 0 0 .25-.25v-3.5a.75.75 0 0 1 1.5 0v3.5A1.75 1.75 0 0 1 12.25 14h-8.5A1.75 1.75 0 0 1 2 12.25v-8.5C2 2.784 2.784 2 3.75 2Zm6.854-1h4.146a.25.25 0 0 1 .25.25v4.146a.25.25 0 0 1-.427.177L13.03 4.03 9.28 7.78a.751.751 0 0 1-1.042-.018.751.751 0 0 1-.018-1.042l3.75-3.75-1.543-1.543A.25.25 0 0 1 10.604 1Z"></path></svg></span></a>
</div>

Drupal is one of the world's most popular open source content management systems! Build simple or complex websites and apps and get access to a rich ecosystem of tools and themes.

## Prerequisites

* Have an existing [AWS Account](/quickstart/cloud/aws)</a>.
* Have an existing <a href="https://console.aws.amazon.com/ec2/" target="_blank">EC2 Pair Key <span>:icon-link-external:</span></a>
* Preexisting VPC <a href="https://us-east-1.console.aws.amazon.com/cloudformation/home?region=us-east-1#/stacks/create?stackName=solodev-vpc&templateURL=https://s3.amazonaws.com/solodev-cms/cloudformation/infrastructure/vpc.yaml" target="_blank" class="btn-orange-sm mt-2" style="margin-left: .5rem;">LAUNCH STACK <span>:icon-play:</span></a>

## CMS Subscription

The following steps cover the setup of the **Drupal Pro** on the AWS Marketplace. Click the **“Continue to Subscribe”** button at the top of the AWS Marketplace listing page to continue the process. Drupal Pro is available as a monthly subscription on the AWS Marketplace. The subscription includes the software's operational and infrastructure costs for running on AWS.

1. Subscribe to Solodev on the AWS Marketplace. <a href="https://aws.amazon.com/marketplace/pp/prodview-wlzg335aurypc" target="_blank" class="btn-orange-sm" style="margin-left: 1rem;">SUBSCRIBE <span>:icon-link-external:</span></a>
2. Review and accept the **"Terms and Conditions"**.
3. Click **"Continue to Configuration"**.

<p><img src="/static/images/drupal/drupal-subscribe-terms.jpg" alt="Drupal Pro Continue to Configuration" style="width: 80%;"></p>

!!!NOTE:
Once accepted, you will receive a thank you message asking you to configure your software. <br>This process can take a few moments. Please do not exit the screen or refresh the page.
!!!

### <span class="text-teal">Configure Software</span>

1. Choose a fulfillment option and software version to launch this software.

<p><img src="/static/images/drupal/drupal-configure-options.jpg" alt="Drupal Configure options" style="width: 35%;"></p>

**Name** | **Description** 
:--- | ---
Fulfillment option | Select a fulfillment option. Default: Amazon Machine Image (AMI).
Software version | Select the software version. The latest version of Drupal Pro is always recommended.
Region | Select the AWS Region.

2. Click <span class="text-orange">**"Continue to Launch."**</span>

<p><img src="/static/images/drupal/drupal-continue-to-launch.jpg" alt="Drupal continue to launch" style="width: 80%;"></p>

!!!danger Important:
On the next screen, click on **"Usage Instructions"** and then select the Quickstart link to continue the installation.
!!!

### <span class="text-teal">Launch Software</span>

Review the launch configuration details and follow the instructions to launch this software.

{% tabs %}

{% tab title="CloudFormation" %}

To continue the installation, click the **Launch** button below and follow the outlined steps.

<a href="https://us-east-1.console.aws.amazon.com/cloudformation/home?region=us-east-1#/stacks/create?stackName=drupal-pro&templateURL=https://drupal-release.s3.amazonaws.com/cloudformation/drupal-pro-linux.yaml" rel="noopener noreferrer" target="_blank" class="btn-orange-lg mb-2">LAUNCH DRUPAL <span><svg xmlns="http://www.w3.org/2000/svg" viewBox="0 0 16 16" width="20" height="20" fill="#fff"><path d="M3.75 2h3.5a.75.75 0 0 1 0 1.5h-3.5a.25.25 0 0 0-.25.25v8.5c0 .138.112.25.25.25h8.5a.25.25 0 0 0 .25-.25v-3.5a.75.75 0 0 1 1.5 0v3.5A1.75 1.75 0 0 1 12.25 14h-8.5A1.75 1.75 0 0 1 2 12.25v-8.5C2 2.784 2.784 2 3.75 2Zm6.854-1h4.146a.25.25 0 0 1 .25.25v4.146a.25.25 0 0 1-.427.177L13.03 4.03 9.28 7.78a.751.751 0 0 1-1.042-.018.751.751 0 0 1-.018-1.042l3.75-3.75-1.543-1.543A.25.25 0 0 1 10.604 1Z"></path></svg></span></a>

!!!NOTE:
If your AWS region is different from `us-east-1`, make sure to select your specific region from the top menu.
!!!

#### Create Stack

1. Create a stack.

<p><img src="/static/images/drupal/drupal-create-stack.jpg" alt="Drupal Pro Create Stack" style="width: 90%;"></p>

2. Click <span class="text-orange">**Next**</span>.

#### Stack Details

##### Provide a stack name

1. Provide a stack name. Stack name must be 1 to 128 characters, start with a letter, and only contain alphanumeric characters.

<p><img src="/static/images/drupal/drupal-stack-name.jpg" alt="Drupal Pro stack name" style="width: 62%;"></p>

##### Parameters

1. Specify the parameters in the setup section.

<p><img src="/static/images/drupal/drupal-params-setup.jpg" alt="Drupal Pro params setup" style="width: 50%;"></p>

Name   | Description
---    | ---
VPCID | Choose which VPC the Application should be deployed to. <br><br>An Amazon Virtual Private Cloud (VPC) is a dedicated environment that lets you launch the AWS resources that power your Drupal Pro in an isolated virtual network. If you do not have a VPC, you will need to create one in your VPC Console. For instructions on how to create a VPC, <a href="https://docs.aws.amazon.com/AWSEC2/latest/UserGuide/using-vpc.html" target="_blank">click here for instructions :icon-link-external:</a>.
PublicSubnet1ID | The ID of the public subnet in Availability Zone 1 in your existing VPC (e.g., subnet-a0246dcd). <br><br>A subnet is a range of IP addresses contained in your VPC. You can create AWS resources, such as EC2 instances, in specific subnets, enabling you to group network resources more efficiently. If you do not have any existing subnets, you will need to create one in your Subnet Console. For instructions, <a href="https://docs.aws.amazon.com/AWSEC2/latest/UserGuide/using-vpc.html#ec2-shared-VPC-subnets" target="_blank">click here :icon-link-external:</a>.
PublicSubnet2ID | The ID of the public subnet in Availability Zone 2 in your existing VPC (e.g., subnet-b1236eea). <br><br>A subnet is a range of IP addresses contained in your VPC. You can create AWS resources, such as EC2 instances, in specific subnets, enabling you to group network resources more efficiently. If you do not have any existing subnets, you will need to create one in your Subnet Console. For instructions, <a href="https://docs.aws.amazon.com/AWSEC2/latest/UserGuide/using-vpc.html#ec2-shared-VPC-subnets" target="_blank">click here :icon-link-external:</a>.
InstanceType | Drupal Pro runs on a single Amazon Elastic Compute (EC2) instance and is defaulted to run on a recommended t2.large server. Depending on your traffic needs, you can select an instance size from the available options in the menu. <br><br>To learn more about which instance to choose based on your traffic needs, <a href="https://docs.aws.amazon.com/AWSEC2/latest/UserGuide/Instances.html" target="_blank">click here :icon-link-external:</a>.
KeyName | Name of an existing EC2 KeyPair to enable SSH access to the instances. <br><br>An Amazon EC2 key pair is a set of security credentials consisting of a public and private key that verify a user’s identity when connecting or communicating with an EC2 instance. Select an existing security group from the menu or configure a new security group using the form provided. If you do not have a Key Pair, you will need to create one in your Key Pair Console. For instructions <a href="https://docs.aws.amazon.com/AWSEC2/latest/UserGuide/ec2-key-pairs.html" target="_blank">click here :icon-link-external:</a>.
HostVolumeSize | Size in GB of root volume.
DeletionPolicy | A Deletion Policy is a configuration that you can set for resources in AWS CloudFormation templates to specify what should happen to the resource when its stack is deleted.
StorageEncrypted | Enable encryption for both Database (RDS) and Filesystem (EFS).
AmiAlias | An AMI Alias refers to a user-defined name or identifier for an Amazon Machine Image (AMI) that simplifies the process of referring to an AMI. <a href="https://docs.aws.amazon.com/AWSEC2/latest/UserGuide/AMIs.html" target="_blank">Click here :icon-link-external:</a> to learn more about AMIs.

2. Drupal Settings.

<p><img src="/static/images/drupal/drupal-settings.jpg" alt="Drupal Pro Settings" style="width: 30%;"></p>

Name   | Description
---    | ---
AdminUser | The admin username to login onto your Drupal.
AdminPassword | The admin password to login onto your Drupal.
DatabaseName | The web database name.
DatabaseUsername | The database admin account username.
DatabasePassword | The database root password.
WebsiteUrl | Name of initial Drupal website.

3. Click <span class="text-orange">**Next**</span>.

#### Configure Stack Options

1. Add a new tag. **This step is optional**.

Tags (key-value pairs) are used to apply metadata to AWS resources, which can help in organizing, identifying, and categorizing those resources. You can add up to 50 unique tags for each stack. If you need more information about tags, click here.

<p><img src="/static/images/quickstart/stack-tags.jpg" alt="Drupal Pro tags" style="width: 80%;"></p>

2. Specify an existing AWS Identity and Access Management (IAM) service role that CloudFormation can assume. **This step is optional**.

<p><img src="/static/images/quickstart/stack-permissions.jpg" alt="Drupal Pro permissions" style="width: 80%;"></p>

3. Select the stack failure options.

<p><img src="/static/images/quickstart/stack-failure.jpg" alt="Drupal Pro failure" style="width: 80%;"></p>

Name   | Description
---    | ---
Behavior on provisioning failure | Specify the roll back behavior for a stack failure..
Delete newly created resources during a rollback | Specify whether resources that were created during a failed operation should be deleted regardless of their deletion policy.

To learn more about the stack failure options, <a href="https://docs.aws.amazon.com/AWSCloudFormation/latest/UserGuide/stack-failure-options.html" target="_blank">click here :icon-link-external:</a>.

#### Advanced options

1. You can set additional options for your stack, like notification options and a stack policy. For more information, <a href="https://docs.aws.amazon.com/AWSCloudFormation/latest/UserGuide/cfn-console-add-tags.html" target="_blank">click here :icon-link-external:</a>.

<p><img src="/static/images/quickstart/stack-advanced.jpg" alt="Drupal Pro advanced options" style="width: 50%;"></p>

2. Click <span class="text-orange">**Next**</span>.

### Review and create

1. Review your settings.

2. Acknowledge the AWS CloudFormation terms.

<p><img src="/static/images/quickstart/stack-capabilities.jpg" alt="Drupal Pro capabilities" style="width: 62%;"></p>

3. Click <span class="text-orange">**Submit**</span>.

### Stacks

1. <span class="text-orange">**Watch your CMS being created!**</span> Once the status changes from **CREATE_IN_PROGRESS** to **CREATE_COMPLETE**, you can access your CMS.

<p><img src="/static/images/drupal/drupal-stack.jpg" alt="Drupal Pro Stack" style="width: 62%;"></p>

2. Click on the **Outputs** tab and copy the AdminUrl value.

<p><img src="/static/images/drupal/drupal-stack-outputs.jpg" alt="Drupal Pro Stack Outputs" style="width: 62%;"></p>

3. Open your preferred browser and paste the AdminUrl value to access the Drupal front-end website.

!!!Note:
Ensure that your browser's address bar includes "http://" instead of "https://."
!!!

4. To access the Drupal login page, add `/user/login` to the end of the website URL. Use the **Admin Username** and **Admin Password** provided in the stacks output to log in.

<p><img src="/static/images/drupal/drupal-login-screen.jpg" alt="Drupal Login Screen" style="width: 40%;"></p>

{% endtab %}

{% tab title="Launch through EC2" %}

#### Choose an Action

1. Select **Launch through EC2**.

<p><img src="/static/images/quickstart/actions-ec2.jpg" alt="Drupal Actions" style="width: 74%;"></p>

2. Click <span class="text-orange">**Launch**</span>.

#### Launch an instance

Create virtual machines, or instances, that run on the AWS Cloud. Quickly get started by following the simple steps below.

1. **Name and tags**. Give your instance a **name**. You can also add additional tags (Optional).

<p><img src="/static/images/quickstart/name-instance.jpg" alt="Drupal Name" style="width: 55%;"></p>

!!!NOTE:
A tag is a label that you assign to an AWS resource. Each tag consists of a key and an optional value, both of which you define.
!!!

2. **Application and OS Images (Amazon Machine Image)**. An AMI contains the software configuration (operating system (OS), application server, and applications) required to launch your instance.

For more information about Amazon Machine Image, <a href="https://docs.aws.amazon.com/AWSEC2/latest/UserGuide/AMIs.html" target="_blank">click here :icon-link-external:</a>.

3. **Instance Type**. Select an instance type that meets your computing, memory, networking, or storage needs.

<p><img src="/static/images/quickstart/type-instance.jpg" alt="Drupal Instance Type" style="width: 55%;"></p>

To learn more about which instance to select based on your traffic needs, <a href="https://docs.aws.amazon.com/AWSEC2/latest/UserGuide/Instances.html" target="_blank">click here :icon-link-external:</a>.

!!!NOTE:
Solodev recommends t2.large server. Depending on your traffic needs, you can select an instance size from the available options in the menu.
!!!

4. **Key Pair**. You can use a key pair to securely connect to your instance. Ensure that you have access to the selected key pair before you launch the instance.
  
<p><img src="/static/images/quickstart/key-pair-instance.jpg" alt="Drupal Key Pair" style="width: 55%;"></p>

!!!NOTE:
An Amazon EC2 key pair is a set of security credentials consisting of a public and private key that verifies a user's identity when connecting or communicating with an EC2 instance. If you do not have a Key Pair, you will need to create one in your Key Pair Console. For instructions <a href="https://docs.aws.amazon.com/AWSEC2/latest/UserGuide/ec2-key-pairs.html" target="_blank">click here :icon-link-external:</a>.
!!!

5. **Network Settings**. Here you can create or select an existing security group, create an instance that can connect using SSH, and more.

<p><img src="/static/images/quickstart/network-instance.jpg" alt="Drupal Network Settings" style="width: 55%;"></p>

6. **Configure storage**. Specify the storage options for the instance.

<p><img src="/static/images/quickstart/storage-instance.jpg" alt="Drupal Storage" style="width: 55%;"></p>

For more information about storage, <a href="https://docs.aws.amazon.com/AWSEC2/latest/UserGuide/Storage.html?icmpid=docs_ec2_console" target="_blank">click here :icon-link-external:</a>.

7. Click <span class="text-orange">**Launch Instance**</span>.

8. You will get a success message. Click on the ID to access your EC2 Instance.

<p><img src="/static/images/quickstart/success-launch.jpg" alt="Drupal Success Message" style="width: 40%;"></p>

#### EC2 Instance

1. Check the **Instance State** and **Status Check** of your instance. Once your instance state changed from **Pending** to **Running**, click on the instance you created to access it.

<p><img src="/static/images/quickstart/instance-state.jpg" alt="Drupal Instance" style="width: 40%;"></p>

2. Click on your **Public IPv4 address** to access your website.

<p><img src="/static/images/quickstart/public-address.jpg" alt="Drupal Public Address" style="width: 25%;"></p>

3. To access the Drupal login page, add `/admin` to the end of the website URL. Use **drupal** as the username and your **instance ID** as the password.

!!!Note:
Ensure that your browser's address bar includes "http://" instead of "https://."
!!!

{% endtab %}

{% tab title="Launch from Website" %}

#### Choose an Action

1. Select **Launch from Website**

<p><img src="/static/images/quickstart/launch-from-website.jpg" alt="Drupal Choose Actions" style="width: 55%;"></p>

2. **EC2 Instance Type**. Drupal runs on a single Amazon Elastic Compute (EC2) instance and is defaulted to run on a recommended t2.large server. Depending on your traffic needs, you can select an instance size from the available options in the menu. 

<p><img src="/static/images/quickstart/instance-type.jpg" alt="Drupal EC2 Instance Type" style="width: 35%;"></p>

To learn more about which instance to choose based on your traffic needs, <a href="https://docs.aws.amazon.com/AWSEC2/latest/UserGuide/Instances.html" target="_blank">click here :icon-link-external:</a>.

3. **VPC Settings**. An Amazon Virtual Private Cloud (VPC) is a dedicated environment that lets you launch the AWS resources that power your Drupal in an isolated virtual network. If you do not have a VPC, you will need to create one in your VPC Console.

<p><img src="/static/images/quickstart/vpc-settings.jpg" alt="Drupal VPC Settings" style="width: 35%;"></p>

For instructions on how to create a VPC, <a href="https://docs.aws.amazon.com/AWSEC2/latest/UserGuide/using-vpc.html" target="_blank">click here for instructions :icon-link-external:</a>.

4. **Subnet Settings**. A subnet is a range of IP addresses contained in your VPC. You can create AWS resources, such as EC2 instances, in specific subnets, enabling you to group network resources more efficiently. 

<p><img src="/static/images/quickstart/subnet-settings.jpg" alt="Drupal Subnet Settings" style="width: 35%;"></p>

If you do not have any existing subnets, you will need to create one in your Subnet Console. For instructions, <a href="https://docs.aws.amazon.com/AWSEC2/latest/UserGuide/using-vpc.html#ec2-shared-VPC-subnets" target="_blank">click here :icon-link-external:</a>.

5. **Security Group Settings**. A security group acts as a firewall that controls the traffic allowed to reach one or more instances. You can create a new security group or choose one of your existing groups. Select an existing security group from the menu or configure a new security group using the form provided. Name your security group and give it a description.

<p><img src="/static/images/quickstart/security-group-settings.jpg" alt="Drupal Security Groups" style="width: 60%;"></p>

To learn more about security groups, <a href="https://docs.aws.amazon.com/AWSEC2/latest/UserGuide/ec2-security-groups.html" target="_blank">click here :icon-link-external:</a>.

6. **Key Pair Settings**. An Amazon EC2 key pair is a set of security credentials consisting of a public and private key that verify a user’s identity when connecting or communicating with an EC2 instance. Select an existing security group from the menu or configure a new security group using the form provided. 

<p><img src="/static/images/quickstart/key-pair.jpg" alt="Drupal Key Pair Settings" style="width: 63%;"></p>

If you do not have a Key Pair, you will need to create one in your Key Pair Console. For instructions <a href="https://docs.aws.amazon.com/AWSEC2/latest/UserGuide/ec2-key-pairs.html" target="_blank">click here :icon-link-external:</a>.

7. Click <span class="text-orange">**Launch**</span>.

8. You will receive a success message to view your instance. Click on **EC2 Console**.

<p><img src="/static/images/quickstart/success-launch-website.jpg" alt="Drupal Launch Message" style="width: 44%"></p>

#### EC2 Instance

1. Check the **Instance State** and **Status Check** of your instance. Once your instance state changed from **Pending** to **Running**, click on the instance you created to access it.

<p><img src="/static/images/quickstart/instance-state.jpg" alt="Drupal Instance" style="width: 40%;"></p>

2. To access the Drupal login page, add `/admin` to the end of your **Public IPv4 address**.

<p><img src="/static/images/quickstart/public-address.jpg" alt="Drupal Public Address" style="width: 25%;"></p>

!!!Note:
Ensure that your browser's address bar includes "http://" instead of "https://."
!!!

3. To log in, use **drupal** as the username and your **instance ID** as the password.

{% endtab %}

{% endtabs %}

## Next Steps

<div class="card-lg" style="margin-bottom: 1.5rem;">
  <div style="display: flex; align-items: center; justify-content: start;">
    <div style="width: 120px;">
      <img src="/static/images/logos/cdn-wordpress.png" alt="Drupal CDN Logo" style="width: 100%;">
    </div>
    <div style="margin-left: 30px; width: 80%;">
      <h2>Drupal CDN</h2>
      <p style="font-size: .9rem;"><strong>Prerequisites:</strong> you need a <a href="https://console.aws.amazon.com/acm/" target="_blank">certificate</a> with the name of site you are trying to launch <br>and have an existing <a href="/quickstart/cms/drupal" target="_blank">Drupal</a>.</p>
      <p class="mt-2">Boost your site's speed by delivering content from servers near your visitors.</p>
    </div>
  </div>
  <div>
    <a href="https://us-east-1.console.aws.amazon.com/cloudformation/home?region=us-east-1#/stacks/create?stackName=drupal-cdn&templateURL=https://drupal-release.s3.us-east-1.amazonaws.com/cloudformation/cloudfront-drupal.yaml" class="btn-orange-lg" target="_blank">LAUNCH <img src="/static/images/icons/circle-play-solid.svg" style="width: 16px; margin-left: 1rem;"></a>
  </div>
</div>

<style>
  .card-lg {
    border: 1px solid #dee2e6;
    box-shadow: 0 1px 15px rgba(0, 0, 0, .15);
    padding: 1.5rem;
    display: flex;
    align-items: center;
    justify-content: space-between;
  }
  .card-lg h2 {
    margin-top: 0;
    font-size: 1.4rem;
  }
  /* Headers */
  .header {
    display: flex;
    align-items: center;
    justify-content: space-between;
    padding: 2rem 1.5rem;
    margin-bottom: 2rem;
    background-color: #eef6ff;
  }
  .header .inner {
    display: flex;
    align-items: center;
    justify-content: start;
  }
  .header img {
    width: 80px;
  }
  .header h1 {
    margin-left: 0;
    font-size: 2rem;
    margin-bottom: 0.25rem;
  }
  .header p {
    padding-left: 2rem;
    margin-bottom: 0;
  }
</style>
